
Right before Labor Day weekend I delivered my first Pecha Kucha, “Alone in the Tetons After Dark.” The constraints of the Pecha Kucha format taught me a few things that could help anyone developing ANY kind of presentation. Read on!
What’s Pecha Kucha?
Pecha Kucha is a Japanese phrase that basically translates to “chit chat”.
Pecha Kucha speakers and performers follow a prescriptive format: they must devise 20 slides/images which will be shown to the audience on a big screen for 20 seconds each. The slides are on a timer, so speakers who stumble or skip their lines have to find a way to keep up with what the audience sees.
This format means speakers must get their point across in six minutes and 40 seconds.
Presenters can give a talk, recite poetry, dance, or most anything they want with the form, so long as they do so with 20 slides. Pecha Kucha events are now a worldwide phenomenon.
Preparing for a Pecha Kucha
Draft your remarks in a spreadsheet
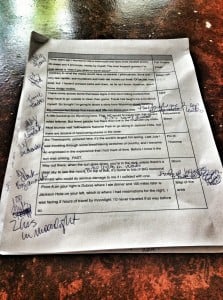 On the first draft of my presentation, I set up a table with two columns from left to right: 1) the script and 2) the name of each slide.
As I started weaning myself from the script, I added the The “key point” column (handwritten in this picture on the far left). I used it to be sure I was hitting the points without reading the script. No one wants to be read to!
The final table had 20 rows (one for each slide) and 3 columns: 1) key points 2) script and 3) slide name. Starting over, I would begin developing a presentation with those three columns.
This website converts words to minutes beautifully. I began writing with no more than 50 words per slide. As I rehearsed and added storytelling techniques like gestures and pauses and allowed for audience interaction, I eventually averaged about 40 words per slide. I suggest you start with your remarks, then add your images to fit, instead of the other way around.
Record your remarks on the slides
I went into the settings of Keynote (Apple’s equivalent to PowerPoint) and set the slides to change automatically at the requisite 20-second interval. Then I used my script to record my remarks into the presentation and played it back to see how it sounded and whether the pacing worked. At first, the slides raced ahead of my script.
From there it was an iterative process. I trimmed the script and moved words from one slide to another and substituted images that better supported the modified script. Each time I made a change, I recorded the presentation and played it back. Eventually the words and slides came together within the 20-second screen timeframe.
Next, I played the presentation in the background while I was doing other things, with the goal of learning it in the way that we subconsciously learn song lyrics when we’re driving around listening to music.
Full-size your images
Pecha Kucha emphasizes the visual experience for the audience. There is a whole wing of the design profession dedicated to images and slides so I won’t attempt to cross that Rubicon in this post.
The event organizers reviewed all of our decks, and I got some great feedback on how to improve mine, starting with sizing the images to fill the screen. Completely. Obviously this isn’t a steadfast rule for all types of presentations or even for all slides in the deck, but next time you have a slide with only one image, try up-sizing it.
It bears repeating to avoid words and bullets whenever possible, or to minimize their use when you must. I didn’t have a single word on my Pecha Kucha slides.
Use big gestures
Next, I paid a visit to my friend Lou Soloman, a communications consultant. I like rehearsing at her studio, where she and her team use video to point out opportunities to use auditorium-sized gestures and to pause so the audience can absorb an important statement.
Lou has coached me on using big gestures before, and I’m working my way into that comfort zone. The video she takes shows me that I really don’t look stupid when I “go big,” even though it’s not yet a natural inclination. I’m reminded of interviews with actors who also remark about the need to over-gesture when they’re on stage as compared to a film studio where the cameras zoom in. Watching my before- and after-coaching videos I knew I was on my way, big gestures and all. At that point, it was a matter of practice.
Rehearse without slides
Once I thought I had my material down pat, I tried an experiment: I fired up my voice recorder and ran through the presentation without slides. Then, I played the recording back with the timed slides to see whether I had internalized the timing (I pretty much had). This served me well because when I got to the venue, I didn’t have a screen of my slides facing me…and I was prepared to stand and deliver without looking over my shoulder all the time to verify I was concurrent with the screen.
I probably rehearsed this talk for five hours, including the iterative drafts, the sessions with Lou, and the five or six times in the wings right before I went on stage. I took the stage without notes, enjoyed myself tremendously and actually finished a bit ahead of the slides…a miracle for this wind bag!
Five takeaways from my Pecha Kucha experience

photo courtesy of mitchellkearney.com
Presenting a Pecha Kucha took my speaking professionalism up a notch, beginning with learning to measure time in twenty-second intervals. The constraint forced me to pay attention to every SINGLE word and taught me how to wring every opportunity out of every one of them.
I believe these five tips will help you develop a Pecha Kucha or another kind of presentation:
- Use the three-column table to draft and organize your remarks and slides. Left to right, the columns are key messages, script, and slide name. If you’re giving a talk without slides, make it a two-column table (key messages and the script) instead of writing it out in paragraphs.
- Record your remarks in your slides, then play them back. You will instantly (and consistently) find opportunities to prune and focus, no matter how many times you do this.
- Play the recorded presentation over and over again to help yourself memorize it. Put it on a play loop if you have the technology to do so, and let it run like the radio in the background of your life.
- Record yourself delivering the talk without slides to see how well your timing holds to the slides and to aid memorization. If you forgot to say something, ask yourself if that’s your subconscious mind telling you the point is irrelevant.
- Change your slides frequently. Twenty seconds might not be an appropriate interval for your presentation, but lingering on a slide for several minutes is BORING —unless you are telling a spellbinding tale or doing something besides speaking, which most people don’t.
Do you have an important presentation on your horizon? I’m here for you.